
In this post I will describe how to add the tailwindcss framework to a Django project.
The example which follows was developed on Windows 10 with VS Code, Django 3.2.9, tailwindcss 3.0.8
Start Here
If you don’t have a Django project to hand, you can clone the example I will be using throughout the rest of this post from GitHub.
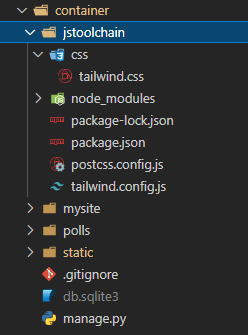
Viewing the project in VS Code, container is the root directory and within this there is mysite which is the Python package for this Django project and polls is an application whose functionality is to render a HTML page.

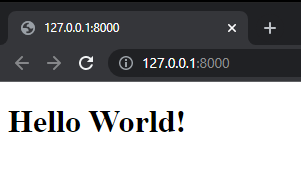
Running the project via the command: python manage.py runserver displays Hello World!
tailwindcss installation and configuration
Open the project in VS Code and within the container directory create a directory called jstoolchain

Start a new integrated terminal session and navigate to jstoolchain and create a package.json file by running the command:
npm init -y
Remaining in the jstoolchain directory install tailwindcss, postcss-cli and autoprefixer
npm install tailwindcss postcss-cli autoprefixer
Create a tailwind.config.js file
npx tailwind init
Create a new file called postcss.config.js and add the following:
module.exports = {
    plugins: [
        require('tailwindcss'),
        require('autoprefixer')
    ]
}
Create a new directory called css and navigate into it. Within this directory create a new file called tailwind.css and add the following:
@tailwind base;
@tailwind components;
@tailwind utilities;
Within the package.json file add the following to the scripts key:
 "scripts": {
    "build": "postcss css/tailwind.css -o ../static/css/tailwind-output.css"
  },
Replace the existing contents of tailwind.config.js with:
module.exports = {
  content: ["../polls/templates/polls/*.{html,js}"],
  theme: {
    extend: {},
  },
  plugins: [],
}
At this point tailwindcss has been set up and the jstoolchain folder should look like this:
Adding tailwind references to the Django Templates
Open the template container\mysite\templates\mysite\base.html and add the following stylesheet reference to the head section
<link rel="stylesheet" type="text/css" href="{% static 'css/tailwind-output.css' %}">
The complete base.html file is shown below with the new link element highlighted.
{% load static %}
<!DOCTYPE html>
<html lang="en">
<head>
    <link rel="stylesheet" type="text/css" href="{% static 'css/tailwind-output.css' %}">
    <title>{% block title%}{% endblock title %}</title>
</head>
<body>
    <div id="content">
        {% block content %}{% endblock content %}
    </div>
</body>
</html>
The final template change is to replace the existing contents of container\polls\templates\polls\index.html with the following:
{% extends "base.html" %}

{% block content %}

<h1 class="font-sans text-3xl font-bold underline">
  Hello world!
</h1>

<p class="font-sans">The quick brown fox jumped over the lazy dog</p>
<p class="font-serif">The quick brown fox jumped over the lazy dog</p>
<p class="font-mono">The quick brown fox jumped over the lazy dog</p>

<div class="h-14 bg-gradient-to-r from-cyan-500 to-blue-500"></div>
<div class="h-14 bg-gradient-to-r from-sky-500 to-indigo-500"></div>
<div class="h-14 bg-gradient-to-r from-violet-500 to-fuchsia-500"></div>
<div class="h-14 bg-gradient-to-r from-purple-500 to-pink-500"></div>

<div class="bg-blue-500 rounded shadow border p-6 w-64">
  <h5 class="text-3xl font-bold mb-4 mt-0">My Title</h5>
  <p class="text-gray-700 text-sm">Content goes here</p>
</div>

<button type="button" class="py-2 px-3 bg-cyan-500 hover:bg-cyan-600 text-white text-sm font-semibold rounded-md shadow focus:outline-none" tabindex="-1">
  Subscribe
</button>

<button type="button" class="bg-gradient-to-r from-teal-400 to-blue-500 hover:from-pink-500 hover:to-orange-500 text-white font-semibold px-6 py-3 rounded-md">
  Hover me
</button>

{% endblock content %}
This HTML displays various tailwindcss classes such as fonts, colours, cards and buttons and is a useful test that tailwindcss is correctly installed.
Build it!
The final step is to start a new terminal session and navigate to the jstoolchain directory and run the build command:
cd container\jstoolchain
npm run-script build
Once this command has completed successfully there will be a new file, tailwind-output.css located at container\static\css
Run the Django project python manage.py runserver and now the Hello World displays several of the tailwindcss classes.

Workflow overview
If tailwindcss classes are added or removed from a template you will need to remember to rerun npm run-script build which is not ideal. It would be better to automate this step so in an upcoming post I will describe how this can be achieved.
Wait, it doesn’t work
The problem with posts like these both as a reader and as the author is there the assumption that if you have followed all the steps it will just work but I know from my own experience that is not always true. If something doesn’t work or you are seeing errors, compare what you have done with the tailwindcss branch of the project I have used throughout this post which is the complete and working (well on my machine!) version.
Acknowledgements
Thank you to the author of this answer on Stackoverflow which was the starting point for this post.
